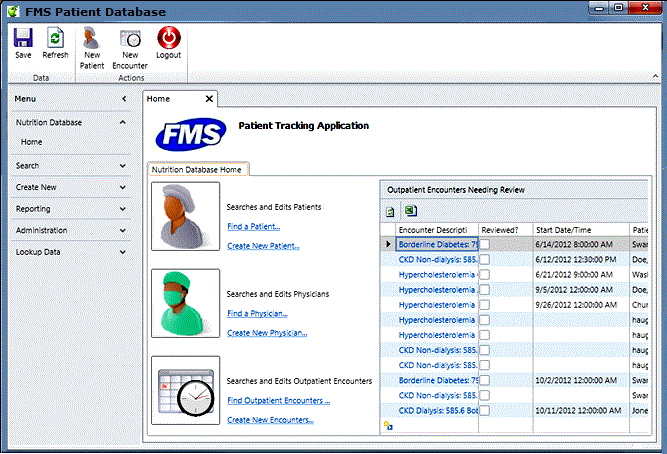
Wednesday, February 8, 2012

Securing MS Linked Tables Connection Strings During Migration

Han posted Securing MS Linked Tables Connection Strings During Migration to the SQL Server Migration Assistant Team Blog on 2/8/2012:

Microsoft Access stores all the connection strings for the respective linked tables in a system table called MSysObjects. As seen below, the connection strings contain clear-text used id and password. With the release for SSMA for Access 5.2, when creating link tables during migration, users will now have the option to not store the user id and password for the linked tables.

A new setting for linked tables can be found under the Project Settings menu. By default, the Store user credentials setting is set to false, thus user id and password will not be persisted in the connection string of a linked table. Switching the setting to true would provide the option to store the user id and password in the connection strings during the creation of linked tables.

It is important to note that after securing the connection string, MS Access users will have to enter the required user id and password whenever the linked tables are referenced in the MS Access Database application. Below shows the prompt presented by MS Access.

Saturday, January 28, 2012

How to save your Access SharePoint Password

Emily Warn posted How to save your Access SharePoint password to the Access Blog on 1/26/2012:

imageRecently, someone posted a comment on IT Impact Inc.'s blog asking how to get SharePoint to remember his password when he logged in via Access. He wanted to avoid having to log in every time.

Ben Clothier, a Senior Access Developer at IT Impact, knew the answer. He wrote a detailed blog post (with plenty of screenshots) that we'd like to share with you.

imageITImpact has been building custom databases with Microsoft Access since 1994, serving customers around the world. Ben Clothier has been Microsoft Access MVP since 2009 and is also a SharePoint Technology Specialist. He has worked on business applications from survey tracking to world-wide supply control databases.

Sunday, December 18, 2011

New Competition for Access Web Databases: InfoPath 2010 Forms and SharePoint 2010 Online

Si Dunn (@grumblecore) posted a comprehensive review of Using Microsoft InfoPath 2010 with Microsoft SharePoint 2010: Step by Step on 12/14/2011:

Using Microsoft InfoPath 2010 with Microsoft SharePoint 2010: Step by Step
By Darvish Shadravan and Laura Rogers
(Microsoft Press, paperback, list price $34.99; Kindle edition, list price $31.99)

imageA 21st century Shakespeare might write: “All the world’s a form, and we are just filling it in.”

One of this book’s authors contends (not completely in jest) that “forms run the world. Imagine modern life without forms, both paper and digital–it’s not possible! Everything that is known and recorded about you, from your birth city to your magazine subscriptions, to your preference of aisle or window seats–yes, all of this information was entered in a form at some point in time.”

imageMicrosoft InfoPath 2010 is used to design and build electronic forms, as well as gather data, without writing code. Meanwhile, SharePoint Server 2010 “offers a robust architecture for managing access to data connections and external systems.” SharePoint is Microsoft’s suite of software tools aimed at making it “easier for people work together,” whether in the same office or scattered around the planet.

imageThis well-written and nicely illustrated book shows how to bring the two products together in powerful ways that (1) enable InfoPath forms to be created and formatted and (2) integrate data from SharePoint and other company systems. InfoPath forms also can be hosted on SharePoint.

The book is aimed at “any information worker that needs to build and use electronic forms that will be stored in SharePoint.” Its goal is to “teach you the basics of building and using InfoPath 2010 forms in a SharePoint 2010 environment.”

The writers assume you are at least a “savvy Office and Windows user.” It is helpful, but not mandatory, to also have at least some basic familiarity with SharePoint Server 2010. “However, even if you’re not a SharePoint guru, most topics in this book should be within your grasp,” they point out.

If you do not have a SharePoint environment in your company, “InfoPath 2010 supports the creation of forms in Microsoft Office 365,” the two authors note. Office 365 is Microsoft’s cloud product that provides online access to a variety of programs for communicating and collaborating. [Emphasis added.]

InfoPath has been around for a few years and recently was given a significant update. But many businesses and computer users do not have it.

That’s not show-stopper when InfoPath and SharePoint work together, the authors point out. ”If you create your forms as browser-enabled form templates, users who don’t have InfoPath installed on their computer can still work with the form in a browser. This lets you share business forms with a variety of users, including employees, customers, and vendors.”

The 446-page book has 14 chapters. The first four chapters show how to create and format forms using InfoPath. The remaining chapters focus on using InfoPath with SharePoint.

According to the two authors, “the mission of this book is to help you understand how to create business forms that provide a pleasant, reliable, and intuitive experience for your users and customers,” they write.

The process of creating, formatting and publishing forms is shown and described in clear, succinct how-to steps. Practice files can be downloaded from a Microsoft site, and the exercise topics range from the basics of form design to building an approval process and working with SharePoint views and dashboards, to (1) “control what fields are displayed at any given time” and (2) “generate reports from any information in SharePoint lists and libraries.”

The authors add: “SharePoint libraries, specifically form libraries, are well suited for storing and managing InfoPath forms.”

InfoPath’s native language is XML, “perhaps the single most powerful method of storing and sharing structured data to come along since the advent of digital computing.” Creating electronic forms has long been a code-intensive process.

InfoPath hides most of the XML behind an easy-to-use interface. And XSLT (Extensible Style Sheet Language) style sheets also “‘sit in front of’ the underlying XML and transform it into the rich and easy-to-use forms that InfoPath can create.”

The book’s illustrations, short paragraphs, step-by-step lists and example files can all help readers get up to speed quickly, whether Microsoft InfoPath 2010 is used with Microsoft SharePoint on a company network or via the cloud, by way of Office 365.

Si Dunn‘s latest book is a novel, Erwin’s Law. His other published works include Jump, a novella, and a book of poetry and several short stories, all available on Kindle. He previously worked in the telecommunications industry as a software and hardware tester and technical writer.

My Introducing Microsoft Office InfoPath 2003 book for Microsoft Press is still generating a few royalty checks.


Friday, November 18, 2011

SQL Server Integration Services 2012 Finally Implements a Pivot UI to Emulate Access Crosstab Queries

Microsoft’s Matt Masson (@mattmasson) described The Pivot Transform – Now with UI! in an 11/17/2011 post:

One of the post-CTP3 changes for SSIS in SQL Server 2012 is the addition of a user interface for the Pivot transform. This post walks through the new UI, which can be found in the new RC0 preview release.

Sample Data

For this example, we’ll be pulling data from the AdventureWorks sample database. We’ll be grabbing the total sales of all products in the Accessories category (ProductCategoryID = 4), grouped by year.

image

The data will look something like this:

image

We want the end results to be pivoted to look like this (Total product sales by year):

image

Setting up the Source

Add an OLE DB Source transform, and add a connection manager for the AdventureWorks sample database. Paste in the query to retrieve the total product sales by year:

image

Add a Pivot Transform from the SSIS Toolbox (found under the Other Transforms section by default).

image

Connect the Source to the Pivot transform. Double click the Pivot transform to open its editor.

The Pivot UI shows a sample pivot table at the top of the form, where you configure the Pivot Key (the column to use for values across the “top” of the table), the Set Key (the column to use for values down the “left” of the table), and the Pivot Value (the column to use for the values in the middle). The bottom of the UI is where you configure the pivot key values.

After mapping my columns to the appropriate keys, the UI looks like this:

  • Pivot Key –> Year
  • Set Key –> Product Name
  • Pivot Value –> Total

image

The Pivot transform requires you to enter all of the possible Pivot Key values (so it can create output columns for each one). You can manually enter each key here (in our case, we’d have a value for each year that appears in our data set – 2002, 2003, and 2004). Alternatively, we can click the “Ignore un-matched Pivot Key values” checkbox and run the package as is. The pivot transform will output a log message containing all of the key values that we can then copy and paste into the UI.

  1. Check the “Ignore un-matched Pivot Key values and report them after DataFlow” execution box
  2. Click OK to save the changes to the UI
  3. Run the package in the designer
  4. When the package succeeds, click on the Progress tab
  5. Look for an information log message from the Pivot transform which contains the keys
  6. Right click the message and select Copy Message Text
  7. Click Stop to end the execution
  8. Double click the Pivot transform
  9. Uncheck the Ignore un-matched Pivot Key values checkbox
  10. Paste the Pivot Key values into the bottom text box
  11. Trim the text so that it only contains the key values – “[2002],[2003],[2004]”
  12. Click the Generate Columns Now button

image

The Pivot UI should now look like this:

image

Click OK to save the changes. We’ll add a Row Count transform to the data flow, and connect it to the Pivot’s output. Add a data viewer on the path so we can see the end results.

image

Run the package, and we can see the pivoted results.

image

Access’s Crosstab Wizard is still faster and easier to understand.

Tuesday, November 15, 2011

Steven Thomas Reported Full-featured Access Services Solution at http://www.accesshosting.com on 11/14/2011

imageOur friends at AccessHosting.com are offering free trials of two Access "cloud" solutions. Curious? Here's the deal, from the source.

Offer text provided by AccessHosting.com:

Reporting services for Access Web Databases in SharePoint 2010 now available - Office 365 users looking web based reporting functionality can republish their databases to accesshosting.com and take advantage of a new introductory price for hosted Access 2010 web databases published to SharePoint 2010.

Remote Desktop Services for Access Applications - Looking to move your existing Access 2003, 2007 and 2010 applications into the cloud quickly and easily? Our Remote Desktop solution provides a simple, secure way to connect multiple external and internal users to your Access databases. You can also use this service to deliver legacy Access applications on the iPad and Android powered devices.

Both of these solutions are available as a no obligation 30-day trial for qualified customers. Visit www.accesshosting.com for complete details.

Read Steve’s original post here.

I’ve used AccessHosting’s services for several cloud-based projects. See my following posts:

Thursday, August 25, 2011

Creating SQLAzure Logins and User Accounts with ODBC and Access VBA

Patrick Wood (@patrickawood) explained How to Use Microsoft Access to Create Logins in a SQL Azure Database in an 8/2/2011 article for his Gaining Access site (missed when published):

imageIn this article we will demonstrate how you can use a Pass-through query in Access with VBA code to create SQL Azure Logins. Microsoft Access can then use the Login and Password to gain access to SQL Azure Tables, Views, and Stored Procedures. We will create a Login using SQL in Access similar to the following Transact-SQL (T-SQL):

CREATE LOGIN MyLoginName WITH password = 'zX/w3-q7jU'

imageThankfully, a user would never have to memorize that password! Because this Login and password would only be used by my Access application the user never sees it and does not even know it exists.

imageThere are several steps involved in creating a Login and Password for SQL Azure. And although most T-SQL that is used in SQL Azure is exactly the same as that used with SQL Server there are some critical differences which we will address in the following steps.

1) Create a Strong Password that Meets the Requirements of the Password Policy.

It is very important to use Strong Passwords because the extra security is needed since we cannot use Windows Authentication with SQL Azure. Passwords must be at least 8 characters long and contain at least one number or special character such as -/~^&.

2) Use Characters That Do Not Conflict With ODBC Connection Strings.

To avoid errors we should not use these ODBC connection string characters []{}(),;?*!@ in our Login Name and Password.

3) Build a Transact-SQL Statement Which Will Create the Login.

We will use the T-SQL CREATE LOGIN statement in a Pass-through query to create the Login. Since Pass-through queries "pass" the SQL unaltered to SQL Azure most of the time the SQL is just like what we would in SQL Server Management Studio (SSMS) and as seen here:

CREATE LOGIN MyLoginName WITH password = 'zX/w3-q7jU'

Another requirement of the CREATE LOGIN statement is that it must be the only statement in a SQL batch. So we are only going to create one Login at a time.

4) Ensure the Login and Password Are Created In the master Database.

This is required because "USE master" does not work in SQL Azure as it does with SQL Server because the USE statement is not supported in SQL Azure. But with Access we can create the Login in the master database by specifying the master database in our Connection String: "DATABASE=master;". We use a Function like the one below to get the Connection String with an obfuscated name to keep it more secure.

Public Function obfuscatedFunctionName() As String
obfuscatedFunctionName = "ODBC;" _
& "DRIVER={SQL Server Native Client 10.0};" _
& "SERVER=tcp:MyServerName.database.windows.net,1433;" _
& "UID=MyUserName@MyServerName;" _
& "PWD=MyPassword;" _
& "DATABASE=master;" _
& "Encrypt=Yes"
End Function

See my article Building Safer SQL Azure Cloud Applications with Microsoft Access for more information about securing your Access application.

5) Create a Function to Execute the SQL and Create the Login.

Place the ExecuteMasterDBSQL Function below in a Standard Module. This Function executes our CREATE LOGIN statement. It can be used any time you want to execute a T-SQL statement in the SQL Azure master database that does not return records. The Function returns True if the SQL was executed successfully or False if the SQL fails to be executed.

'This procedure executes Action Query SQL in the SQL Azure master database.
'Example usage: Call ExecuteMasterDBSQL(strSQL) or If ExecuteMasterDBSQL(strSQL) = False Then
'
Function ExecuteMasterDBSQL(strSQL As String) As Boolean
On Error GoTo ErrHandle
Dim db As DAO.Database
Dim qdf As DAO.QueryDef
ExecuteMasterDBSQL = False 'Default Value
Set db = CurrentDb
'Create a temporary unnamed Pass-through QueryDef. This is a
'practice recommended in the Microsoft Developer Reference.
'The order of each line of code must not be changed or the code will fail.
Set qdf = db.CreateQueryDef("")
'Use a function to get the SQL Azure Connection string to the master database
qdf.Connect = obfuscatedFunctionName
'Set the QueryDef's SQL as the strSQL passed in to the procedure
qdf.SQL = strSQL
'ReturnsRecords must be set to False if the SQL does not return records
qdf.ReturnsRecords = False
'Execute the Pass-through query
qdf.Execute dbFailOnError
'If no errors were raised the query was successfully executed
ExecuteMasterDBSQL = True
ExitHere:
'Cleanup for security and to release memory
On Error Resume Next
Set qdf = Nothing
Set db = Nothing
Exit Function
ErrHandle:
MsgBox "Error " & Err.Number & vbCrLf & Err.Description _
& vbCrLf & "In procedure ExecuteMasterDBSQL"
Resume ExitHere
End Function

6) Use a Form to Enter the Login Name and Password

We can make it easy for users to create a Login by using a form. To do this we need to add two text boxes and a command button to the form. Both text boxes need to be unbound. Name the text box for the Login Name txtLoginName. Name the text box for the Password txtPassword. Name the command button cmdCreateLogin. The form should look something like this, but without the extra touches for appearance sake.

Create Logins Form

Add the code below to the command button's Click event. After the code verifies that a Login Name and Password has been entered, it calls the ExecuteMasterDBSQL Function to create the Login in our SQL Azure master database.

Private Sub cmdCreateLogin_Click()
'Prepare a Variable to hold the SQL statement
Dim strSQL As String
'Build the SQL statement
strSQL = "CREATE LOGIN " & Me.txtLoginName & " WITH password = '" & Me.txtPassword & "'"
'Verify both a Login Name and a Password has been entered.
If Len(Me.txtLoginName & vbNullString) = 0 Then
'A Login Name has not been entered.
MsgBox "Please enter a value in the Login Name text box.", vbCritical
Else
'We have a Login Name, verify a Password has been entered.
If Len(Me.txtPassword & vbNullString) = 0 Then
'A Password has not been entered.
MsgBox "Please enter a value in the Password text box.", vbCritical
Else
'We have a Login Name and a Password.
'Create the Login by calling the ExecuteMasterDBSQL Function.
If ExecuteMasterDBSQL(strSQL) = False Then
MsgBox "The Login failed to be created.", vbCritical
Else
MsgBox "The Login was successfully created.", vbInformation
End If
End If
End If
End Sub

The code in the Form checks the return value of the ExecuteMasterDBSQL Function and informs us whether or not the Login was successfully created. Once we have created a Login we can create a Database User for the Login and grant the User access to the data in the SQL Azure Database. Creating a Database User for the Login appears to be a good subject for another article. [See article below.]


Patrick continued with How to Create SQL Azure Database Users With Microsoft Access VBA on 8/23/2011:

imageWhy do we need a SQL Azure Database User Account? An Access Database cannot access SQL Azure Objects such as Tables, Views, or Stored Procedures without one. That is, unless you use your SQL Azure Administrator account which would be living very dangerously if [you] were distributing your database to others. So before your database can do anything with SQL Azure, a Database User Account must be created that it can use. Also permissions must be granted to use the necessary SQL Azure Tables, Views, and Stored Procedures. We are going to show you how you can use a pass-through query in Access to create SQL Azure Database Users using Access VBA.

imageDatabase users must be created in the database in which they will exist because the "USE" statement can only work for the current database in SQL Azure. So to create a Database User we must use a query that runs in the Database in which we want to create the User. And since it would be confusing, to me at least, to log in using "JoeDeveloper" and work as Database User "SamCodeSlinger" my normal practice is to create a Database User with the same name as a Login Name.

imageIf we were using SQL Server Management Studio (SSMS) or the Windows Azure Management Portal we could create a Database User as shown with the following Transact-SQL (T-SQL):

CREATE USER MyLoginName FOR LOGIN MyLoginName

Or:

CREATE USER MyLoginName FROM LOGIN MyLoginName

But you can easily create Database Users with Microsoft Access using the following two procedures, passing the Login Name to the CreateSQLAzureDBUser Function:


'Example usage: Call CreateSQLAzureDBUser("MyLoginName")
Public Function CreateSQLAzureDBUser(strLoginName As String) As Boolean
On Error GoTo ErrHandle
Dim db As DAO.Database
Dim qdf As DAO.QueryDef
Dim strSQL As String
CreateSQLAzureDBUser = False 'Default Value
strSQL = "CREATE USER " & strLoginName & " FOR LOGIN " & strLoginName
'Create the Database User
Set db = CurrentDb
Set qdf = db.CreateQueryDef("")
'Change obfuscatedFunctionName to the name of a Function
'that Returns your SQL Azure Database Connection String
qdf.Connect = obfuscatedFunctionName
qdf.SQL = strSQL
qdf.ReturnsRecords = False
qdf.Execute dbFailOnError
'If no errors the Database User was Created
CreateSQLAzureDBUser = True
ExitHere:
'Cleanup for security and to release memory
On Error Resume Next
Set qdf = Nothing
Set db = Nothing
Exit Function
ErrHandle:
MsgBox "Error " & Err.Number & vbCrLf & Err.Description _
& vbCrLf & "In procedure CreateSQLAzureDBUser"
Resume ExitHere
End Function

The Database User must be created in the Database in which it is to be used and not in the master Database. You can do this by changing MySQLAzureDatabaseName in the obfuscatedFunctionName Function to the name of the database in which you want to create the users.

'It is best to change the name of this procedure for better security for your use.
'The strIn Argument value, "Wb_gR%/PD\-k&yZq~j>l", is used like a Password to keep
'unauthorized users from getting your Connection String. You should also change it
'to suit you before you use it in a distributed application.
Public Function obfuscatedFunctionName(strIn As String) As String
If strIn = "Wb_gR%/PD\-k&yZq~j>l" Then
obfuscatedFunctionName = "ODBC;" _
& "DRIVER={SQL Server Native Client 10.0};" _
& "SERVER=tcp:MyServerName.database.windows.net,1433;" _
& "UID=MyUserName@MyServerName;" _
& "PWD=MyPassword;" _
& "DATABASE=MySQLAzureDatabaseName;" _
& "Encrypt=Yes"
Else
obfuscatedFunctionName = vbNullString
End If
End Function

For better security you can keep the Login Name, Password, and User Name hidden in the code without exposing it to the Access user.

We now have the ability to create Database Users but we still need to Grant Permissions before our Access Database can use this User Account to access any data in SQL Azure. We plan to show how you can do that in the articles to come.

You can download the code used in this article from our Free Code Samples page.


Sunday, August 7, 2011

Visual Studio LightSwitch as a Microsoft Access Upgrade Path

Jeffrey Palermo (@jeffreypalermo) described Visual Studio LightSwitch, an Upgrade Path for Microsoft Access in a 7/30/2011 post to the Headspring blog:

imageThere are lots of business systems written in Microsoft Access. One of the most successful companies I know is Gladstone, Inc, makers of ShoWorks software. This software runs most of the county fairs in the U.S. From entries, to checks, to vendors, this piece of software does it all to help manage and run a fair and keep track of all the data. And it is written in Access.

imageStarted on Access 97, I have watched this software grow through the various Access upgrades, and it tests the limits of the platform. It’s author, Mike Hnatt, is one of the premiere Access gurus, and Microsoft has previous invited him up to the Redmond campus to be a part of internal Software Design Reviews, or SDR’s. Mike knows the limits of access, but even with the vast array of other development options out there, nothing comes close to parity with the capabilities he relies on – until today.

image

image222422222222This is my first LightSwitch application. I just installed the software, ran it, defined a table structure and a few screens. It’s really simple, and I see that i runs a desktop version of Silverlight. It feels like Access (I have done some of that programming earlier in my career) because you just define the tables and queries, and then ask for screens that work off the data. You can customize the screens to some degree, and you can write code behind the screens, just like you can write VBA behind Access screens. This is my first time looking at Lightswitch in a serious way since it was just released. I will be looking at it more because it belongs in our toolbelt at Headspring. There are plenty of clients who have Access and FoxPro systems. These systems have tremendously useful built-in functionality that is prohibitively expensive to duplicate in a custom way with raw WPF and C#, but Lightswitch provides a possible upgrade path that won’t break the bank.

In case you are wondering what it looks like to develop this, here it is.

image

Notice that there is a Solution Explorer, and you are in Visual Studio with a new project type. I was really pleased that I could write code easily.

image

I tried some ReSharper shortcuts, but they didn’t work. I guess we’ll have to wait for ReSharper to enable this project type. Here is my custom button that shows the message box.

image

I think LightSwitch as a lot of promise for legacy system rewrites, upgrades, and conversions. Because it’s 100% .Net, you can mix and match with web services, desktop, SQL Server, etc.

Jeffrey is COO of Headspring.

It’s nice to see a well-known and respected .NET developer give credit to Microsoft Access where it’s due.